Tidal Cycles is software that works on top of another piece of software called SuperCollider.
Together, you can use them to produce music using code.
Today I set up these tools and made my first sound with them. Setup was a bit tricky, and this post is as much for myself to document what I did as it is for others pursuing their own setup in the future.
The first step is to install SuperCollider, following the install links for your platform at supercollider.github.io.
SuperCollider is a super cool tool in and of itself, featuring a fully formed object-oriented language with which to generate, template, pattern and mix sounds.
Tidal Cycles features a completely different language, though: a domain-specific language in Haskell. In order to set up Tidal Cycles, you don’t need to learn any of the native SuperCollider language or do any of the tutorials offered on startup.
Once SuperCollider is installed, Tidal Cycles requires installation of some other dependencies. They offer good setup instructions for each platform here (link leads to MacOS instructions, but other platforms are in the sidebar).
These dependencies include:
- SuperCollider: already installed above
- SuperDirt: a SuperCollider sampler designed for Tidal Cycles
- Atom Editor with Tidal Cycles plugin: optional (I uninstall it and don’t use it in the final setup, but good for testing)
- Haskell
- The
tidalHaskell package
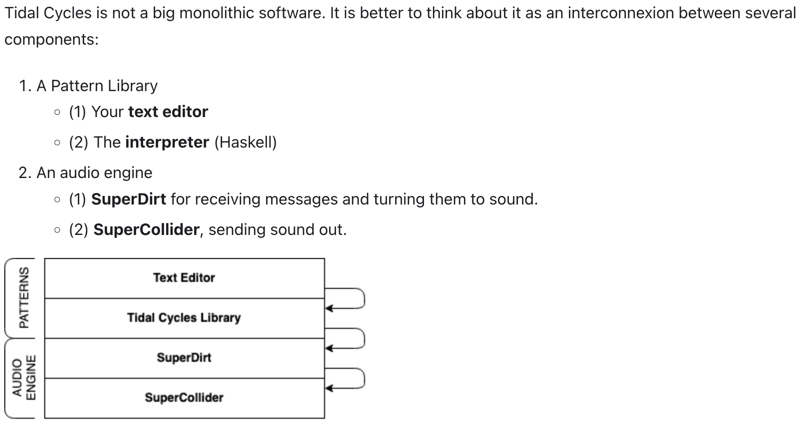
A good explanation for how these components interact (source):
To test things are working:
Open SuperCollider.
Paste in the left editor box
SuperDirt.start;.Run it by hitting Shift-Enter with your cursor on the same line. You should see output in the bottom right like:
SuperDirt: listening to Tidal on port 57120
Keeping SuperCollider and SuperDirt open and running, open Atom. Confirm Tidal Cycles plugin is installed (visible on the bottom right).
Create a new file called
test.tidalAdd the line
d1 $ sound "bd sd"Type ctrl-Enter or cmd-Enter with your cursor on the same line. A beat should play!
Now this is the stock setup working. I changed mine a bit for convenience, but if you’d like to you can stop here and proceed with actually using the software to make music :).
After this confirmation things were installed and working, I uninstalled Atom, as it’s not an editor I use regularly.
I’m a fan of vim.
I then went to SuperCollider and configured it to start up SuperDirt whenever it is first opened. I did this by clicking
File -> Open startup file, pasting in the following text, and saving the startup file:
/*
This is an example startup file. You can load it from your startup file
(to be found in Platform.userAppSupportDir +/+ "startup.scd")
*/

(
s.reboot { // server options are only updated on reboot
    // configure the sound server: here you could add hardware specific options
    // see http://doc.sccode.org/Classes/ServerOptions.html
    s.options.numBuffers = 1024 * 256; // increase this if you need to load more samples
    s.options.memSize = 8192 * 32; // increase this if you get "alloc failed" messages
    s.options.numWireBufs = 64; // increase this if you get "exceeded number of interconnect buffers" messages
    s.options.maxNodes = 1024 * 32; // increase this if you are getting drop outs and the message "too many nodes"
    s.options.numOutputBusChannels = 2; // set this to your hardware output channel size, if necessary
    s.options.numInputBusChannels = 2; // set this to your hardware output channel size, if necessary
    // boot the server and start SuperDirt
    s.waitForBoot {
        ~dirt = SuperDirt(2, s); // two output channels, increase if you want to pan across more channels
        ~dirt.loadSoundFiles;   // load samples (path containing a wildcard can be passed in)
        // for example: ~dirt.loadSoundFiles("/Users/myUserName/Dirt/samples/*");
        // s.sync; // optionally: wait for samples to be read
        ~dirt.start(57120, 0 ! 12);   // start listening on port 57120, create two busses each sending audio to channel 0

        // optional, needed for convenient access from sclang:
        (
            ~d1 = ~dirt.orbits[0]; ~d2 = ~dirt.orbits[1]; ~d3 = ~dirt.orbits[2];
            ~d4 = ~dirt.orbits[3]; ~d5 = ~dirt.orbits[4]; ~d6 = ~dirt.orbits[5];
            ~d7 = ~dirt.orbits[6]; ~d8 = ~dirt.orbits[7]; ~d9 = ~dirt.orbits[8];
            ~d10 = ~dirt.orbits[9]; ~d11 = ~dirt.orbits[10]; ~d12 = ~dirt.orbits[11];
        );
    };

    s.latency = 0.3; // increase this if you get "late" messages
};
);
I then aliased sclang to the installed script in my shell startup file (~/.zshrc). This may or may not be required
depending on your platform.
alias sclang="/Applications/SuperCollider.app/Contents/MacOS/sclang"
In order to use vim with Tidal Cycles, I installed vim-tidal. Make sure
you run the make command to symlink the tidalvim and tidal scripts as recommended so that you can run tidal
in a terminal.
I then created a new tmuxinator project called music with the following
configuration:
# /Users/leo/.config/tmuxinator/music.yml

name: music
socket_name: music
root: ~/projects/music

windows:
  - editor:
      panes:
        - vim
  - server:
      panes:
        - sclang
        - tidal
This allows me to run tmuxinator start music and 2 windows open up:
- a main window for vim
- a hidden split window running
sclang, a “headless” version of SuperCollider, andtidal, the vim-tidal plugin script that starts the Haskell interpreter including the tidal package
Finally, by adding the following configuration line to my ~/.vimrc, I configure vim-tidal to send commands to the
correct tmux socket and window + pane (the tidal pane):
" vim-tidal combined with tmuxinator music
let g:tidal_default_config = {"socket_name": "music", "target_pane": "music:2.2"}
Now, I can fire up vim configured with SuperCollider and Tidal Cycles running with tmuxinator start music. When I’m
done, I save my files and run tmuxinator stop music, and everything shuts down.